For this assignment I have pre thought about all tasks and have brought myself a few different tools to help me:

As you can see in the photo, I have got some interesting items to use and experiment with. I have got:
Liquin impasto - for thickening up the paint and helping my brush strokes to show better in the paint. I have a tube of matt and gloss.
Gesso - for adding primer on to painting surface but also to add texture in to my paintings.
Super heavy gesso - for adding thicker textures on painting grounds.
Rabbit skin gesso - I researched on the Internet and found this is a good item to use for texture in oil paintings, it was expensive so I only got one small bag to test out.
Splatter tool - a brush that you apply paint on and then you twist the top which creates spatters of your paint finely.
Sand paper - could create good effects for sanding down dried thick paint to create textures.
Varnish - create glossy areas in my work.
Linseed oil - help thin the paint more if needed.
Pva glue - to help stick items down in textured grounds.
Sponges and dabbers - for different ways to apply paint and experiment.
I am looking forward to trying these out any to see how they can help in my work.
Exercise: Impasto
For this exercise I have to explore different ways of applying paint. I have decided to paint three quick paintings of fruit to compare textures of each technique. I can then see how I can use each one for different areas of painting.
Impasto painting practice

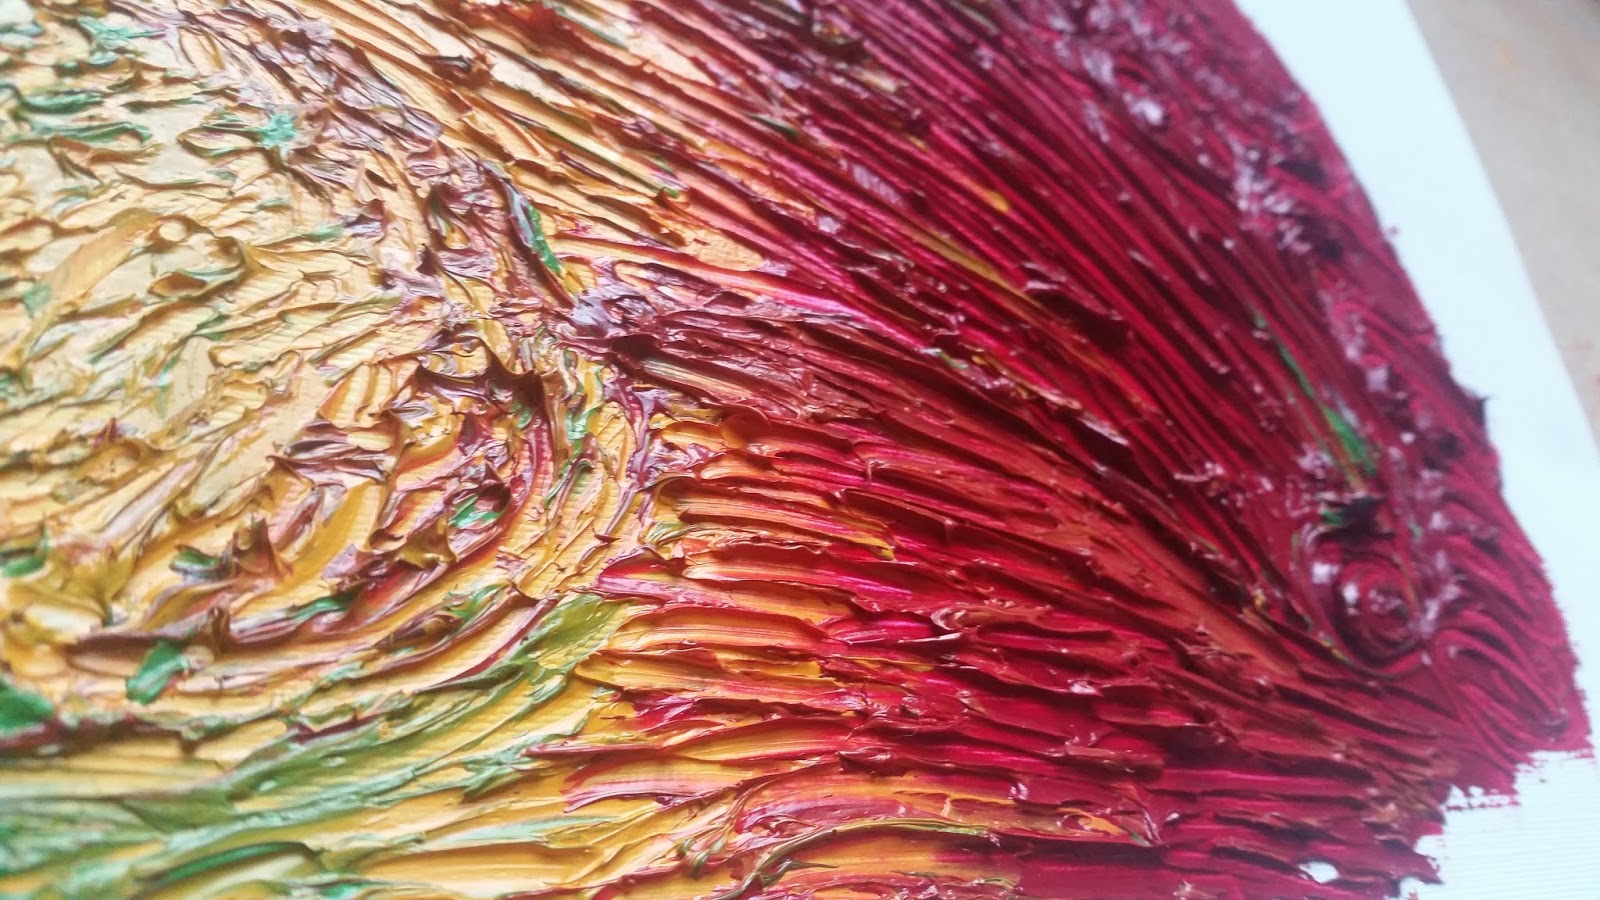
I mixed three colours in different tones thickly, with liquin medium. The liquin medium, mixed in with the paint helps to keep paint thick and helps the paint hold the paint brush strokes into it. I got my fruit in a simple composition, so that I can concentrate on my texture and technique with the paint. I looked at the fruit and applied the paint thickly to create impasto. I painted with a brush, painting in all different directions with the thick paint to make more textured effect in my painting. I tried to blend the colours together the best I could using the technique with the thick paint. It actually didn't take me long to do this painting, which I was quite surprised at. I usually spend a bit longer on paintings in the past, due to probably being too neat.


This painting has been a good way of helping me to loosen up with my art and I was actually enjoying it. Once finished It came out well. A little more detail of the brown spots on the banana could of been added, but overall I think I did a good job. I understand now by doing it a little looser and applying texture it does actually make your painting more interested. You can look at it close and see all the interesting textures and the way I have has painted it. As well as that you can step back and see the overall image of what subject I painted. I am really excited now to try the next experiment which is with the knives.
Knife painting practice

I have just finished this painting, I absolutely loved using the knifes, to create my painting (again of the fruit). They created so much texture and they give your painting such a great realistic effect.
I started applying the paint with the knife thickly onto the oil paper. I started with the banana in my composition and used my Yellow and greens, to shade in the shape of the banana. I then painted in the orange and then the Apple. I looked at them closely and expressed there textures in my painting as good as I could. The banana had brown spots on it, I showed this with adding brown paint on a small pointed end of the knife. The apple is red and yellow, so I mix these two colours together and applied them on the oil paper, to try to capture the colours of the fruit. The texture created by using the knives, was different to what I have done previously. It shows my application of the paint onto the canvas and you can see the direction I was painting in on each part. The background area and the part where the fruit was sitting on the table shows a clockwise movement in the knife Strokes I had applied onto the oil paper. The paint was sticking out from the painting ground, creating a 3D textured effect. This created a more interesting painting. I realised as well as taking a step back to see the overall painting, you can also look closely and decipher the textures and how I applied them onto my canvas. This helps to create a personal voice and more viewers interested in your work, then just a plain painting.

I really like how I created texture here . I like how the stem of the apple sticks out and them on top a thick layer of the red and yellow to show a 3d effect on the apple.


For the orange I did use a slight dabbing technique with the knife to try to capture the texture of the surface. I think this helped to show the fruit more realistic.
Scratching


For this Final task on this exercise, I had to apply a thick layers of paint onto my canvas and using a paint brush upside down scratching to the surface to show the image of what you are looking at which again was my bowl of fruit. This technique helps spread colours and mixes colours together on the canvas to create interesting effects. I applied three colours and to my oil paper and then with the back end of the paintbrush, I sketched my fruit into the paint. I found it enjoyable as it was messy and fun to get the paints to swap over to each different side. The only issue I had is that it is hard to see the fruit in the painting. I tried to use different textures for each of the fruit but it still is hard to understand what I am painting.
I am now going to research sgraffito and then compared to see if I have done my attempt correctly
Sgraffito is a pottery technique produced by applying lots of colours in different layers and then scratching off some of the layers to reveal the colours underneath this created contrasting images patterns and textures in art. I had a look on the internet and realised I had done sgraffito when I was young:


Second attempt at Sgraffito
Sgraffito is a pottery technique produced by applying lots of colours in different layers and then scratching off some of the layers to reveal the colours underneath this created contrasting images patterns and textures in art. I had a look on the internet and realised I had done sgraffito when I was young:
This is where you had a layer of a colour and your scratched it off to see the colours underneath and you could then create a image from it. I have realised my attempt was more merging the colours together then scratching to see a paint colour below. Here are some sgraffito paintings for me to get more of an idea:
http://www.brianclegg.co.uk/brianclegg/creativeideas/impasto-sgraffito-resists
http://www.brianclegg.co.uk/brianclegg/creativeideas/impasto-sgraffito-resists
Second attempt at Sgraffito
After searching I now realise that I may have done exercise wrong so I wanted to quickly attempt it again just to make sure I understand the application and the way the technique create texture just because I may be able to use it in the future and also understand it when looking at artist who have used it in their paintings:
I have now added layers of acrylic paint as they will dry quickly just for practice and then I am going to use a layer of oil on top and attempt sgraffito.

As you can now see I have attempted with red and blue paint. I think this quick sketch has worked out well. You can now see the correct technique of Sgraffito. I used a end of paint brush, card and some scissors to etch in to the paint. When scratching in to the paint of the top layer, it reveals the underneath colour, sometimes I wanted my tools to scratch off more paint then they did but perhaps this was because in some areas the top layer of paint was applied on too thickly. Overall I understand this technique and will think about in went creating paintings.
Over the last week, I have gone around the house and garden to find useful objects to create textures in paint. I found a variety of different tools and objects and I am now going to begin to test them out on A3 paper and write about them, to see which ones were the best ones that I think I could use in my own work
I have now added layers of acrylic paint as they will dry quickly just for practice and then I am going to use a layer of oil on top and attempt sgraffito.

As you can now see I have attempted with red and blue paint. I think this quick sketch has worked out well. You can now see the correct technique of Sgraffito. I used a end of paint brush, card and some scissors to etch in to the paint. When scratching in to the paint of the top layer, it reveals the underneath colour, sometimes I wanted my tools to scratch off more paint then they did but perhaps this was because in some areas the top layer of paint was applied on too thickly. Overall I understand this technique and will think about in went creating paintings.
Experimentation with other tools to create texture in my work
Over the last week, I have gone around the house and garden to find useful objects to create textures in paint. I found a variety of different tools and objects and I am now going to begin to test them out on A3 paper and write about them, to see which ones were the best ones that I think I could use in my own work
I have now spent today painting, using all different types of techniques and tools that I can think of. I want to firstly want to look at each A3 piece of paper and decide on what works well and created interesting textures.

To start off with, I did textures using my fingers. I had fun with this and created some surprisingly good textures.

To start off with, I did textures using my fingers. I had fun with this and created some surprisingly good textures.

I like technique number 5 which was done by applying thick paint onto my surface and dabbing my fingertips into the paint this created a three-dimensional texture on my sheet of paper the texture could be used for a rough sea maybe trees and flashes in puddles

I also like texture 6, which I created by pinching a medium sized blob of paint on my thumb and then applying it onto paper squeezing it in a round motion on to the surface this creates a great texture, this could be used for material or a scaly technique.

Also in the above photo, I used light blue and dark blue paint applied onto my finger and dragged it down the surface of the paper I think this would be useful for creating calming small waves of streams or gentle rivers also maybe fields in landscapes.


I also like texture 6, which I created by pinching a medium sized blob of paint on my thumb and then applying it onto paper squeezing it in a round motion on to the surface this creates a great texture, this could be used for material or a scaly technique.

This was created by dabbing on the surface with my fingers, it is similar to the thumb technique but smaller in size. I like how the paint sucks upward when lifting your fingers off the page.
Also in the above photo, I used light blue and dark blue paint applied onto my finger and dragged it down the surface of the paper I think this would be useful for creating calming small waves of streams or gentle rivers also maybe fields in landscapes.

This technique looks wishy washy with the motion I used I grabbed paint in between my fingers and moved it around fast on to the paper. To me it looks similar to creating impasto with a paint brush.
After experimenting with paint using my fingers, I decided it actually was fun to do and it created interesting results.
Next up, I tried to think of other ways I could apply paint. I went around the house to try and get different type of tools:


First up I tried sponges, I had a few artist sponges that were on sticks. I dabbed them into paint, to try creating different effects. Firstly, when I was dabbing the sponge on to the paper, I noticed when you release the sponge from the paper, it pulls the paint upwards creating texture on the paper. I like the way it left marks showing the paper colour through the paint. When dabbing a plain sponge onto paper, it creates a style I would use for creating texture of leaves on trees or bushes, also carpets and snow. It creates a soft texture to look at but close up you can see the roughness of it.
Using a square sponge and dabbing it, creates fine lines, yet pulling paint away from the surface of the paper creates texture this could be used for fencing in a landscape and maybe for tree trunks or branches and to help create straight lines in paintings (top right in above picture).

Another way I tried was to apply a thick layer of paint onto my paper and then dabbing the sponge into it. It created the same kind of texture by the paint withdrawing from the surface, but this time I could not see the paper through the paint as the paint is too thick. This would be a good texture to use for snake skin as some parts looks a bit scaly it could be used for lizards crocodiles that kind of tough rubbery texture.

I then used a brush that was flat and round at the end of the Bristles. I tried different textures by applying paint first onto the surface and then applying paint on to the end of the brush and dabbing that onto the paper. I really like the texture is had created. It was very interesting when looking up close. It is different to the sponge technique in a sense that it didn't leave as much transparent areas in the paint but it did leave an interesting texture. I could use this for different types of material such as wool, fir and fleece it has that thick texture to it. It creates a bubbling texture on a surface, which is great for objects such as towels too.

The next one I decided to look at using, was a spoon and seeing what I could create by applying paint onto it or using it to mix paint.

I applied thick layers of paint onto my testing sheet. I got the back of the spoon and rolled it through the paint, this created a very good textured surface. When raising the spoon away from the paper it created suction same as how the sponge lifted the paint off the paper, but also it left tiny ripples from pulling the spoon away. It looked like a good technique for creating leaves.

I also tried the front side of the spoon and rolled that into a thick layer of paint this created a different texture, which showed more lines going through the paint. This would be good for creating grassy fields, if painted in a certain direction.
Another tool I tried was sticky tape. I tried putting thick layers of paint on the paper and applying the tape and pulling it off, to create texture. It didn't give as much texture as I thought it would but it created a more subtle texture. This could be useful for far away Fields or objects in the distance. It could be also used for textures of fruit such as a pear, apples, carrots, items with subtle texture.

On this A3 paper, I also tried using a flower and having its head dipped into paint and then applying it onto the surface. It created a very unusual texture. I'm not exactly sure what I would use it for at the moment. Perhaps fields of flowers, or for flower beds, as it has that delicate feel to it.
I also tried dabbing the stem into the paint and applying it onto paper. It gave Lines but they were not fully painted in. They were quite transparent, this would be useful for grassy areas and branches. It also creates a good fabric texture such as for upholstery.(see image above for whole of A3 sheet).
I also tried dabbing the stem into the paint and applying it onto paper. It gave Lines but they were not fully painted in. They were quite transparent, this would be useful for grassy areas and branches. It also creates a good fabric texture such as for upholstery.(see image above for whole of A3 sheet).

This next page I used a toothbrush and tried to create different types of textures with different parts of it. I used the bristly front of the brush first and created textures by applying paint on to the brush head, then dabbing it on to the paper. I tried applying a layer of paint onto the paper and then brushing into it with my toothbrush. I discovered that these techniques used with the toothbrush created a more rougher texture, compared to those of my circular flat brush, I tried previously. The brush texture created great details for grassy areas, foliage and also fabrics in paintings.

I also decided on trying the back of the toothbrush head, where the ripples are for when you are cleaning your tongue. I dipped the brush into paint and dabbed it on to the surface. It created a surprisingly even more 3D texture then I have gotten so far from other tools. It is very bumpy on the surface and it has a small vein patterns going through it. This again is where the suction of the paint is, when I lift up the brush from the surface. I think I could use this texture to help in my paintings for perhaps foreground areas in landscapes to create more of a 3D dimensional effect in my work. I think also looking at it it could create a good texture for bark on trees and timber.

I also decided on trying the back of the toothbrush head, where the ripples are for when you are cleaning your tongue. I dipped the brush into paint and dabbed it on to the surface. It created a surprisingly even more 3D texture then I have gotten so far from other tools. It is very bumpy on the surface and it has a small vein patterns going through it. This again is where the suction of the paint is, when I lift up the brush from the surface. I think I could use this texture to help in my paintings for perhaps foreground areas in landscapes to create more of a 3D dimensional effect in my work. I think also looking at it it could create a good texture for bark on trees and timber.


I wanted to experiment using cling film, I thought I may be able to get some interesting effects from it. I applied paint onto my surface and then place cling film on top and with my fingers squeezed around the paint underneath the cling film. I lifted it off and it revealed a good texture in my paint. This would be useful for a lot of textures that are hard and rough.


This interesting surface above was created buy using a brillo pad and dabbing it in to paint. It created a good texture, perhaps useful for a cracked landscape from the hot weather. It could also be used for cotton materials and fine grassy areas.

On this sheet of paper I have used a large brush. I tried dabbing and applying strokes on to the surface. This made me realise that by using a large brush, it creates rougher textures then using a smaller brush. I think these textures that I created could be useful for water areas large areas of landscapes to fill in easy but yet also create texture. I think you could also use this for brickwork as it has that kind of rough texture to it, but this would have to be done on a larger scale to create detail.
I feel that this page shows the least three-dimensional textures coming out of a surface, however there are still good marks been made, especially with the fruit net:


Using a fruit net, I did a layer of paint on the surface and pressed the net on to it. Another way I tried was putting the fruit net on the paper first, then painted over it. It creates a very good scaly technique. This would be great for snake skin, crocodiles and lizards. I think it would also work well for textures of cobbles on old roads and pavements.
I also attempted to use a wooden stick on here, I realised it is quite similar to when I was scraping the paint with my nails Revealing the underneath layers of paint. I feel this would be a good technique to show texture on wood and also trees.

Above I used to circular end of a brush which was wooden and dabbed it into a thick layer of paint I had applied on to the canvas. It created circular texture in my paint area with parts of the paint raising up this would be a good texture for flowers in gardens, brickwork even textures of fruit and other types of food.


On this last page here you can see some very rough textures that I have created:

One of my favourite ideas on here, was when I painted a thick layer of paint, then realised I could actually use my knuckles to grind into the paint which created a textured area but also some flat areas. It was an unusual texture, one that I haven't seen yet, where parts of the paint are flat yet other areas randomly heightened. This could be a good texture for water, man-made materials such as cement

Another one I liked on here was by using a small square piece of cardboard, applying paint on to it and then stamping it onto the paper. The paint sucked upwards when lifting off the cardboard creating a great texture this text you could be used for feathers on birds, bark and even textures for fruit.


Conclusion of texture research
Overall after looking at all these types of textures, created by different items that I found around my house, it is clearly easy to say that, textures create more opportunity for ideas and to explore. It just shows that a painting doesn't have to be done with just a brush, it can now done using various items to create a 3D painting and gather more interest in to your work. I have come to realise, that painting is not just about using a brush and painting an object it's the way you portray it, what textures, colours, atmosphere and mood you're going to use. This shows the viewer you own personal voice. Some of these textures I will be looking to use in my work. I feel adding textures is more a better way for me to paint, then just painting with the paint brush, as I have enjoyed it more and found interest of trying to create more of a three dimensional painting.
Looking back at some of my paintings, now having looked at textures, I can see places where I could have applied more texture to improve my paintings such as the flower painting, with the vase of flowers on the table. I could have used some of these textures to add more interesting areas. I could have used the circular end of the wooden stick to create the Blossoms on the flowers and I could have also used the large brush to have painted the table to apply the wood texture onto it.
Another painting which could have improved with added texture, is my landscape of a barn in a field. I could've used various textures here for the bushes, trees, fields and the barn. Perhapsby using the toothbrush, the back end of a spoon for the pathways and the coal from the fire for the grit to create the path. I think this exercise has given me a direction on now where I need to be going and to start thinking how I can paint better.
Dripping, Dribbling and Splattering
Jackson Pollock research
image from:http://www.jackson-pollock.org/

Jackson Pollock is known for being a main part in the 20th century his was of art caused a great stir and helped abstract art become a type of art. Pollock in his work was trying to show a new means to describe pictorial space. Jackson Pollock used a style where he would allow the paint to drip from the paint can. Instead of using the traditional paint brush, he would add depth to his images using knives, trowels, or sticks. The risks and the creative approaches he took, led future artists to create with passion, as opposed to trying to follow set boundaries or guidelines.
Number 23 ,1948
http://www.tate.org.uk/art/artworks/pollock-number-23-t00384

Big Dipper, 1947 by Jackson Pollock
http://www.jackson-pollock.org/reflection-of-the-big-dipper.jsp
Jackson Pollock research
image from:http://www.jackson-pollock.org/
Jackson Pollock is known for being a main part in the 20th century his was of art caused a great stir and helped abstract art become a type of art. Pollock in his work was trying to show a new means to describe pictorial space. Jackson Pollock used a style where he would allow the paint to drip from the paint can. Instead of using the traditional paint brush, he would add depth to his images using knives, trowels, or sticks. The risks and the creative approaches he took, led future artists to create with passion, as opposed to trying to follow set boundaries or guidelines.
Number 23 ,1948
http://www.tate.org.uk/art/artworks/pollock-number-23-t00384
Big Dipper, 1947 by Jackson Pollock
http://www.jackson-pollock.org/reflection-of-the-big-dipper.jsp

Green Silver, by Jackson Pollock
http://www.jackson-pollock.org/green-silver.jsp

Indian Red Ground, 1950 by Jackson Pollock
http://www.jackson-pollock.org/mural-on-indian-red-ground.jsp

As you can see above I have picked out some of Pollock's work. Looking at these and understanding where he was going with it now makes more sense. why do you have to paint a subject or object? His method was to express and the enjoyment of ways you splash, dribble and splatter paint on to a canvas. He explained that there is no outside and inside all negative and positive areas are just as important to each other. Where ever paint fell was a rick but that is not a negative, it was meant to be, every drop of paint was important as the next. He worked with his canvas on the floor and wend at any angle he wanted around his canvas to apply paint. He also used knives and other tools to create textures in these paintings too. I am looking forward to getting started and have a got for my self to see what I can create.


For my first attempt, I did this painting above. I decided on two colours originally which was the dark blue and black. I then went outside to do this as it was quite messy. It was dry but cloudy outside, so it was a good opportunity for me to get outside and quickly have a go at it. I mixed my paint ready and I watered it down quite a bit with turps. I decided to use a medium paint brush. I started off splattering the black and blue paint on to my canvas, in a downwards motion. I then used a green/blue on top to add a lighter shade. I then looked at it and decided that I needed a brighter colour to contrast with what was already on my canvas. I decided to use yellow. When splattering the yellow I stood the opposite side of the canvas and splattered it on. I then got a smaller brush and splattered with that too. I liked how there was some white showing through of the gesso, so once I was happy with the overall look of it, I decided to stop. I think I created a very interesting painting and I felt that I had found a painting technique that I am actually good at.

This next painting was to experiment with dribbling on to a canvas. I gesso covered a piece of cardboard then mixed three colours with extra turps.


I attempted to do another splattering image and this time I used Pink, black, yellow and rose. I mixed a few different effects together such as splattering, Dribbling and dripping paint. The most interesting part of this art is when it dried. There were white cracks coming through the dribbles of paint, which created an interesting painting to look at. I didn't really understand where the cracks came from in the paintwork but it made the painting better.
I realised in these types of paintings you get to see negative and positive areas and create different layers of paint in a painting the way the paint is applied depended on the angle in which you were sputtering or pouring it this created natural negative and positive places in my art in some of the work I wanted to leave blank canvas areas as I think it created more of a dramatic look

I also did this painting which to me, looks like a Galaxy full of stars. I painted the background first and then began to splatter paint in all different directions. I really like how the purple spot in the middle landed on the yellow lump area. It fell naturally onto the yellow without me directing it.


My image what I see here in this art is a galaxy with the large yellow lump area being the centre of it. In this abstract painting I like how I did a dark background and then painted effects on top of this. During painting this, it began raining outside but I didn't care because I was having too much fun at expressing my self.

Lastly I splattered the paint onto a canvas again, but then afterwards I used a piece of cardboard and dragged it through the paint to see what would happened. When the paint mix together, it created a murky colour.


I'm not a real fan is this painting, it's probably the least one I like, but it is good to see what else you can create after spotting paint on your canvas. It is interesting how you can use tools to etch in images or add different textures, to create more of an interesting painting.
I think when do you any paintings it's hard to decide when you're finished or unfinished, but I think only yourself an artist, knows when to stop. Take a step back and decide for yourself when it's finished. Every artist is different, someone could apply 200 different splatters of paint where another artist could just do say two splatters paint. onto a canvas. They both have the same important meaning because it is from each individual artists voice and there own ideas. Creating individuality is key and a painting is only finished when you see fit. I don't think a painting is ever finished, or to overdone. I just think you need to know yourself and know what type of painter you are. This helps decide on when to stop and to realize for your self when you're painting is complete.
This exercise has helped me learn to be free with paint. I am always trying to capture objects and scenes perfect, but I am beginning to see that I shouldn't, as you can see them for what they are already. I need to think of more interesting ideas and use my imagination and with my own mind, create some thing unique. Everyone thinks differently and this can be key to find you own voice.
The splattering, dripping and dribbling practice can be useful for capturing different seasons as autumn or winter to show rain and snow falling or to show sprays of water from waterfalls in a landscape scene. I think also it is a great technique to show objects up close such as rocks and pebbles. Also a good idea is to use this in abstract art. It is a good way to express yourself and be free with paint. I also feel that you could use this technique to show movement and emotions by how aggressively you splash the paint onto the canvas. The colours you use, can show the viewers the mood you were in whilst painting. Overall I had real fun with this task I am really enjoying assignment 5 with experimenting and getting use to different techniques. I am hoping that I can bring it all together to create some good paintings in the future.
The splattering, dripping and dribbling practice can be useful for capturing different seasons as autumn or winter to show rain and snow falling or to show sprays of water from waterfalls in a landscape scene. I think also it is a great technique to show objects up close such as rocks and pebbles. Also a good idea is to use this in abstract art. It is a good way to express yourself and be free with paint. I also feel that you could use this technique to show movement and emotions by how aggressively you splash the paint onto the canvas. The colours you use, can show the viewers the mood you were in whilst painting. Overall I had real fun with this task I am really enjoying assignment 5 with experimenting and getting use to different techniques. I am hoping that I can bring it all together to create some good paintings in the future.
Research point
Abstract expressionism began in the 1950s-60s. Is was created in New York by a few artists who came together to show there new found technique. They were known as the New York school. There technique for painting was to apply splatters, dribbles and dabs of paint on to canvasses to show emotion and be expressive. There were two types of Abstract expressionism: Action painters, who used there emotions expressively and the others were artists who liked to express through abstract forms and colour.
The main action painters were jackson Pollock and Willem De Kooning. they both worked spontaneously and used large brushes to create sweeping marks in there paintings. Pollock as I mentioned earlier use to dance around his canvas and used his inner impulses to just throw paint about to create art.
I have also looked at action painting further on the Internet. Tachism art is an abstract art that developed in Europe in the 1940s and 1950s characterised by spontaneous brushwork, drips and scribble-like marks. Tachism was the European equivalent to abstract expressionism in America. The name derives from the French word ‘tache’, meaning a stain or splash.
I am now going to look on the internet and pick out some paintings from various artists who used this technique.
Jackson Pollock
untitled
http://artuk.org/discover/artworks/untitled-211623/search/keyword:jackson-pollock
Yellow Islands
http://artuk.org/discover/artworks/yellow-islands-117781/search/keyword:jackson-pol
I have already looked a bit at Pollocks work. I have picked out a few more to look at. The first painting untitled caught my eye and I never saw it when I looked at her work previously. I think the colours all go together well and the contrast stands out which makes this an attractive piece to look at. Here Pollock has used big sweeps with large brushes and splattered it, by throwing it on to the canvas at different angles. The blues and reds are very contrasting and work well together. This painting reminds me of a parrot because of the colours used and part of the red shape in the middle looks like a beak. I think the emotion is a fun jolly one, which may have been the mood of Pollock at the time he painted it.
The other painting above called Yellow Islands is a very interesting painting, there is only three colours used here to create this painting. It looks as though he must of spent a long time dancing around his painting and there looks like a lot of layers. I cant really connect with this painting, maybe because it is so scrambled up. This painting could of been painted to show then emotion of stress with too many things on his mind at the time. The yellow islands in the painting could resemble areas in his stressful mood where he can lie down and for a moment feel at ease.
william De Kooning
The Visit
http://artuk.org/discover/artworks/the-visit-198501/search/keyword:willem-de-kooning
Women singing
http://www.tate.org.uk/art/artworks/kooning-women-singing-ii-t01178
These two paintings are painted in the same way which suggests that Kooning knew his personal voice, Both paintings to me look like human figures painted in an abstract way. Both painting seem to me to be images of women. The painting with the singers is more clear as you can see there lips where kooning was trying to express the emotion on singing in to his painting. By looking at his technique you can see that he was trying to capture the eccence of the scene rather then the acutal image. He was using his inner urges to apply his paint on to the canvas to create his art. His strokes with paint was thick and chunky. His work to me is not something I feel passionately about but his idea beyond his technique is more so.
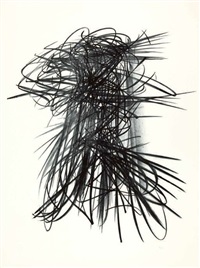
Hans Hartung
Hans Hartung T1937-33 1937
http://www.tate.org.uk/art/artworks/hartung-t1937-33-l01886
Hans Harting 24 1953
http://www.tate.org.uk/art/artworks/hartung-24-p77200
L1963-93
http://www.artnet.com/artists/hans-hartung/
Hans Hartungs art its not some thing I would paint myself. I understand the meaning and the reason for it, but it is not really my taste. I find them boring and too simple to keep an interest in them for too long. Out of the three here, I like T1937-33 the most. This is because compared to the scribble and lines in the others, this one is more interesting to look at. He has used thick and thin lines and colour to create this piece. It reminds me of natural items in nature such as feathers, twigs and small stones. The colours are subtle that also to give a natural tranquil feel to it.
Kline Franz
Kline Franz - Four Square
http://www.theartstory.org/artist-kline-franz-artworks.htm#pnt_3
Black Reflection 1956
http://www.theartstory.org/artist-kline-franz-artworks.htm#pnt_3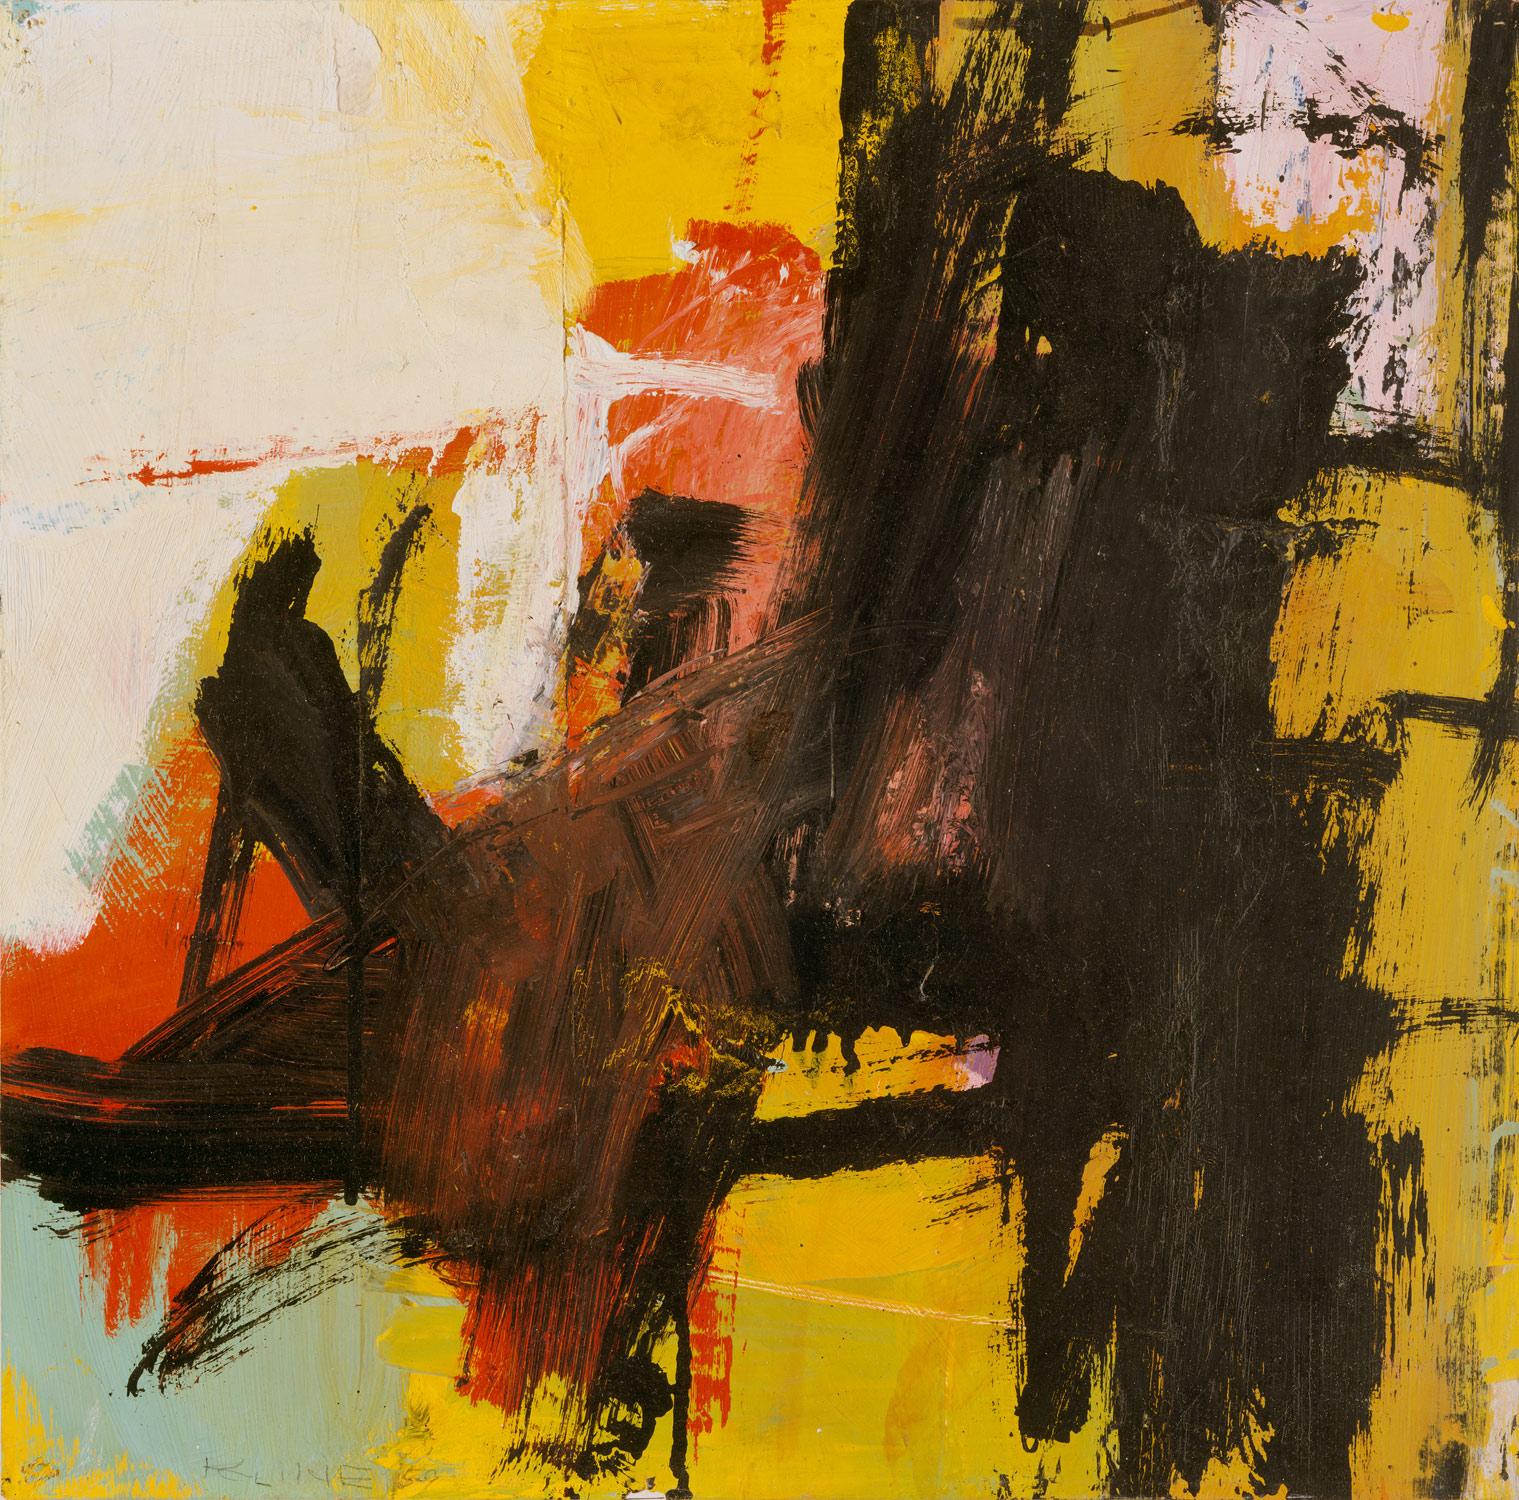
Woman 1950-52
http://www.theartstory.org/artist-kline-franz-artworks.htm#pnt_3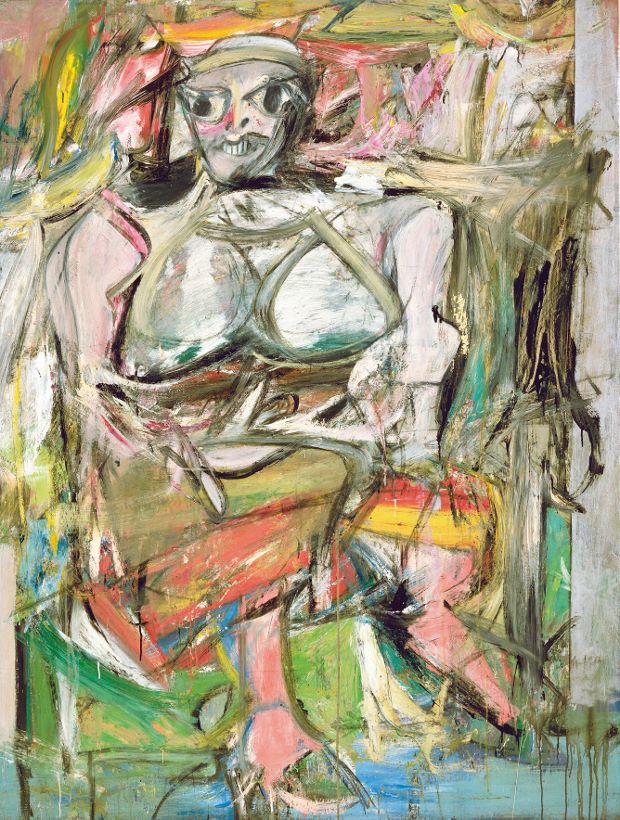
Kline Franz art is more attractive to me. He uses bold lines that are big statement marks in his works and strange shapes are forms which give interests. I like the Black reflection paintings because of the texture and overall art produces. I think this paintings is his shadow? hence the name of a dark reflection. He has layered his paint, the black on top of the yellow and red makes a striking painting. This painting doesn't look like he has splattered paint, more like he has painted streaks and dabs with a large brush on to the surface.
The next painting is his most famous piece of work called 'Woman' I think he was trying to paint an evil, angry woman as her face is scary and the whole painting has monster qualities about it. Her sharp long teeth and big eyes give you a sense of warning. Her body is painted so ugly and looks too big proportioned for her head. In areas of this painting I can see, that he has let the paint drip down the canvas. It is green which gives the paintings a sickening mood around the woman. I am not sure who she is, but I wonder how she felt when, or if she ever got to see the painting of herself. There is a mixture of colours and looking at her body again also looks to me like she is tangled up in a rope, of some sort. The painting is strange and weird, but I am interested in it as it makes you think and wonder what he was trying to capture.
Overall
Overall, | have looked at these artists and Studied there ideas and painting techniques . for me this type of art is interesting. I first thought it was boring just splattering paint on to a canvas, but after having a go for myself, I came to realise that it was fun, fresh and liberating to create this type of work. I found it very expressive and by using my innner voice I splatter paint in different and ways I felt I should. I found it very therapeutic and it is a great way to release some tensions by throwing paint around. Looking at the research I found it quite useful to see how other artists use of the same method. You Can see in the artists paintings what emotions and Moods, they were in whilst painting
there art or trying to show in their art. This research has also helped me to think about putting my paint urges in to my own paintings and go with my instinct, rather them be afraid to put paint on to a surface. The exercise has given me the confidence to express myself better with the use of paint.
No comments:
Post a Comment